Tutorial
Welcome to RepoLion Repossession Software!
 As you read this tutorial you will get a quick overview of how this management program works. This software and Microsoft Word is all that is needed to run your office and grow your business. All data is kept on your computer! Our goal was to keep it SIMPLE, everything is in one place! You may be a single user at this point, but as your business grows, this software grows with you! For more detailed information we recommend downloading and printing the RepoLion User Manual.
Phone List
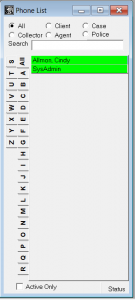
When the program opens, the phone list is automatically opened in the left sidebar. The phone list is your primary tool used to navigate through the RepoLion application. The phone list contains each client, collector, case and agent in the system. You will notice that each of the above categories is color coded, to be easily distinguishable. At this time, your new RepoLion database should have two green entries in the phone list, one for you, and one for the System Administrator. The radio buttons at the top of the phone list can be used to narrow your search for a particular category of names. Additionally, the alphabetic tabs along the side of the phone list will limit the search further to include only names beginning with the letter chosen. The search box allows you to fine tune your search. As each letter is typed into the search box, the resulting list will be shortened to those matching names. Once the name is found, double-clicking on the chosen name will open its detailed folder. Double click on YOUR name in the phone list to open the agent folder.
Basic Folder Information 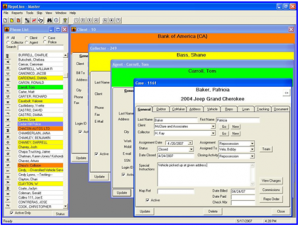
All folders look and work basically the same way. The top of the folder is color coded based on the type of folder you are in, as in the phone list. Below the heading of the folder are tabs used to select the type of information you wish displayed. You will notice in some of the tabs there are buttons which pertain to information in that tab. At the bottom of the window is the update and close buttons that pertain to the entire folder. In general, throughout the whole system, the only piece of information that is required to be entered in each folder is the name. For best results, when creating a new folder of any type, enter the name and click update to add the folder to the database. Then continue to add any additional information, clicking update when completed. Any additional information is optional.
System Setup 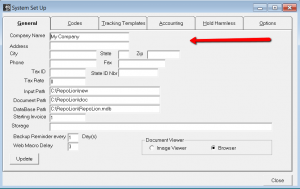
Click on the File menu at the top of your screen and select “System Setup”. This window is used to customize the system to your needs. At this time, enter your company name, address and phone number as you would like it to appear on reports and invoices. (If you have a Windows XP system, set the document viewer option to and then click update.)
Code Setup 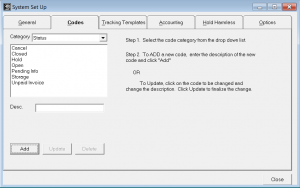
Click on the Codes tab. Click on the drop down box next to the category field and choose Status. You will see a basic list of status codes that have been entered for you. If you see one that can be deleted, simply click on that code (such as Lock-Up) and click on the delete button. This will remove the code chosen. If you wish to add a code, such as Storage, or Unpaid Invoice, click on the description (Desc.) field to enter the new code. Click on the “Add” button and the new code will appear in the list above. This same procedure can be used to modify any and all codes within RepoLion. For the remainder of the tutorial, we will define the following status codes.
- Cancel: The assignment was canceled by the client.
- Closed: Vehicle has been delivered and the case is now closed and complete
- Hold: Represents the client has requested a hold on the case.
- Open: If the initial runs are dry, this status is used for the continuing field investigation.
- Pending Info: Waiting for Collector to get back with some info about the debtor.
- Storage Lot: Vehicle has been repossessed and has been moved to secure storage.
- Hot: This represents new and high priority cases.
- Unpaid Invoice: Invoice has not been paid yet.
Now would be the time to add Transport as a Status. Transportation has been arranged by the client and vehicle is waiting for pick up. You are now ready to close the System Setup window. To do so, simply click on “Close”. This will bring you back to your phone list screen.
New Client 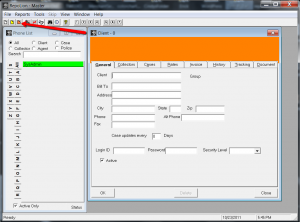
To add a new Client Folder, click on the orange icon page in the tool bar, or go to File> New> and Client from the application menu at the top of the screen. Enter the name and billing address of the Client and click the “Update” button at the bottom of the screen. When you add a Client for the first time, you continue on to the Rate tab and setup the agreed upon rates with your Client.
Client Rate Setup 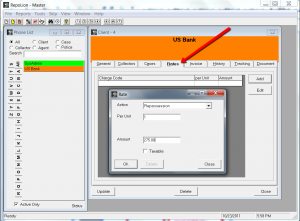
This is done in the following way. Click the “Add” button on the right. This will give you a dialog box in which you will choose a “Charge Code” from the drop down menu, next to the Action field. For this tutorial, select Repossession. Read special note above. Tab down to the Amount Box and enter the amount agreed upon with client put it in the Per Unit Box 1 and click “OK”. Now let’s add the rest of your charges the same way that you added the Repossession.
When adding a storage charge of $15.00 per day or what ever you agreed upon. Click on Add, choose secured lock-up, leave Amount field blank and enter the 15.00 in the Per Unit field. Click OK. Click on Update and then Close the Client Folder.
New Collector 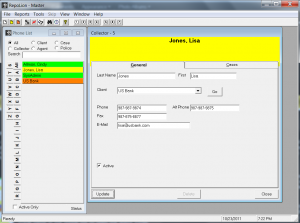
In RepoLion we use the term “Collector” to refer to the contact person working for the Client. The Collector is that person who repeatedly calls you for case updates! To add a new “Collector”, click on the yellow icon page in the tool bar, or select File> New> Collector from the application menu at the top of the screen. Enter the collector’s name, and then press update. Select the Client from the drop down list next to the Client field. Enter the collector’s phone number and e-mail address, click update and close the collector folder.
New Case 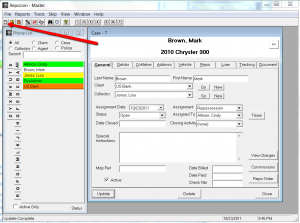 Now that you understand the basics of RepoLion, let’s walk through a new case from start to finish. Your client will either fax or email an assignment over to you. You have two options in how you can enter the data, without document imaging or with document imaging. Option One – Without Document Imaging
Click on the white icon page at the top of the screen, or select File> New> Case. This will open a blank Case file folder. To begin, enter the Debtors Last name, First and Click “Update”. Next, select the Client from the dropdown list. If this is a new Client or the client is not on the list, click the “New” button next to the Client field. This will open a blank Client folder for you to add the new Client. You will then select the Collector name from the drop down list. If this is a new Collector or the Collector is not on the list, click the “New” button next to the Collector field. This will open a blank Collector folder for you to add the new Collector.Continue to complete the General information by setting the Assignment Date (which defaults to the current date), the Assignment Type, Status and Assigned To fields. Continue on to the Debtor Tab. Enter the Debtor Address and any other information you consider relevant to this case. After clicking update, you can click on the map button to view an online map to the address entered. You may, optionally, continue to the CoMaker and Address tabs, entering any information which is available. On the Vehicle Tab, enter the Year, Make, Model & VIN, as well as Color and Tag if you wish. If the collateral is not an automobile, enter the description under the Make and Model fields. Continue on to the Loan Tab. You will need to enter the Client Account Number for this case. This is very important as it is the best identifier in communicating with your Client. The remaining loan information is optional. Click Update to save.

In summary, the most important information is Debtor Name, Client Name, Account Number and VIN Number. The rest of the information is available to assist the field agent if need be. The next step to adding your New Case: From the Report Menu select Repossession Order to print the new Assignment Sheet/Work order/Repossession Order to give to the Field Agent. After all the Cases have been entered for the day, select Report, then Case Status Report. Select the status of Hot and sort by Agent. This will print a Hot list summary of the cases for that Agent.Additionally, if you are “a glass is half FULL” kind of person, you can print a blank condition report to send with your field agent! This is done by selecting Condition Report from the Report menu while the Case folder is open.
Option Two – Document Imaging
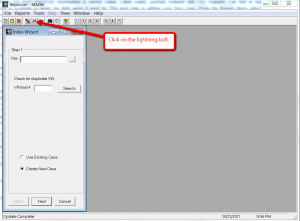 Open your Fax or Scanner application and double click on your newly received Assignment Sheet. From your Fax application select File, Save As, which will normally open a common dialog box. Set the SAVE IN location as C:/Program Files/RepoLion/New (for the default install directory). Enter any File Name and set the File TYPE to .Tif (or Tiff) and click Save. Close your Fax Application and return to RepoLion. Select the “Lightening Bolt” at the top of the screen to open the Index Wizard. Click the …button next to the File field, which will give you a common dialog box to select that assignment which you just saved, and click open.
This action will bring your assignment sheet up on your screen in RepoLion, allowing you to begin entering your new Case and to store the document for future reference. Next, enter the last 4 numbers of the VIN in the new case and click the Search button. This will display a list of all cases on file with the matching last four of the VIN to avoid duplication and identifying re-opened cases. If you find that the VIN does match a case already on file, double-click the name on the list to open that case folder. In the Index Wizard, on the left, select Open Existing Case and click Next. Most of the time a matching case will not be found. You will then click Create New Case and click on Next.
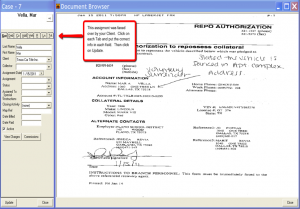 The next side bar will require the Case name, Client name, Account Number and VIN. This can all be found on the Assignment sheet to the right. Click Next to continue to the last step. You then will have the choice to enter an alternate document description or otherwise it will default to Case Assignment. You also have the choice to Move or Copy the file from the New directory into the RepoLion Document Repository.
We recommend that you MOVE each file and repeat this process until the directory is empty. Click Finish. The Case folder will be open for you to continue adding any additional information.
Updates 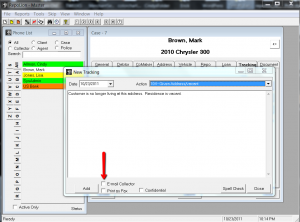
As we all know, frequent and informative updates to the collectors reflect favorably upon your business. We recommend that you keep the collector informed via e-mail at each step of the process. This is made possible through the Tracking Tab within each Case folder. Double click to open a case folder. Click on the Tracking Tab and then click on the New button to add a new tracking line. Select the Action from the drop down list. Remember you can add, change or delete Tracking Actions from the System Setup window. Once you click on the appropriate action, it will appear in the body of the tracking note. For each Tracking Action, there is an associated Tracking Template (also stored in System Setup). You may add any additional information required within your tracking notes. Click the E-mail Collector box (note this option is not available if you have not entered an e-mail address for this collector) then click Add. Your e-mail application will open and is ready to send to the collector.
Click in the body of the e-mail to position the cursor and paste the content of the tracking notes you wish to e-mail. You can paste by right clicking your mouse and clicking paste or click paste from the edit menu or by using the short cut of pressing your control key and the letter V.
Periodically, it may be necessary to inform the Collector or client on the status of all active cases. Open the Collector or Client folder and select the Case Tab. Click on the Report button to produce an update report on all active cases associated with this Collector or Client. A dialog box will appear, allowing you to select the range of dates you wish the report to include. The report will include all tracking notes entered during this time period. The report will default to showing all tracking notes entered during the previous week.
Closing A Case When the vehicle is recovered, you will want to update your case folder accordingly. Open the Case folder and change the Status. For the purpose of this tutorial we will change the Status to Storage. Set the date closed to correct date and enter the Closing Activity, such as Repossession. This will be chosen from the dropdown box next to that field.
Creating an Invoice
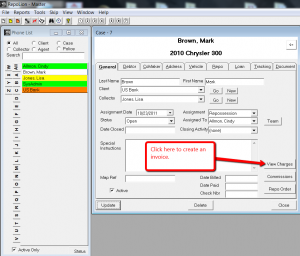
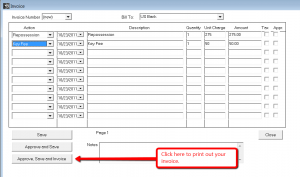
Click on the View Charges button. At this time we will enter all of the charges for the Client invoice. If the appropriate rate is available from the client folder, you may select the rate from the Action drop down. This automatically fills out the remainder of the line. You may type over any field to correct or change descriptions or amounts. Quantity and Unit Charge are optional fields which if entered will automatically total the amount of that line. You may add any additional charges by typing in the description and amount. Click the “Approved” check box at the right end of the line to approve the charges to appear on the next invoice for this client. Click “Save” and close the window. The first step in Invoicing is to run the Unbilled Charges Report from the Report Menu. This report will list all charges Approved and Unapproved. When you open the report, you will have the option to select any one Client or for all Clients. Review the report to be sure that all of the appropriate charges are entered and correct. Only those charges which are Approved will be included on the Invoice. You must go to each Case folder to correct any errors in your charges. To produce an invoice for a Client, open the Client folder and select the Invoice Tab. Click on the “New” button. The New Invoice will appear giving you the opportunity to verify the invoice total. Click OK to produce and print your Invoice.
Paying Commissions
Next, click on the “Commission” button on the case folder to add employee commissions. Select each agent to receive a commission from this case and enter the commission amount in the same way that you added charges above. Because, in our tutorial company, we pay commissions after the invoice is paid. We will leave the commissions “Unapproved” and click on “Save”, then “Close”. When payment is received on your invoice, go back to the Invoice Tab of the Client folder and select the invoice from the table. Click on the Pay button, which will automatically approve all of the pending commissions on all of the cases listed on this invoice. To produce the Pay Statement for the Agent, open the Agent folder and go to the Pay Tab. Click on the New button to produce a listing of the commissions to be paid.
Condition Report
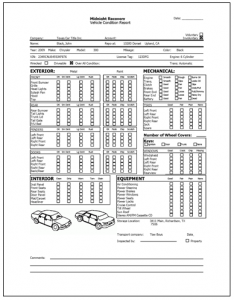 Next we will go to the Vehicle tab to enter and print the completed condition report. Click on the “Condition” button to enter the Condition report. Here you will find six separate Tabs. The first is the General Tab. Along with basic information we have provided an area for comments. Once you have completed the information on the General Tab, click on Update and continue to the next tab. Each Tab will have fields to mark by clicking on the field associated with the appropriate description. Before moving on to the next Tab, you must Update what you have entered. If you mark a field in error, click again to remove the mark. When you have completed each Tab, click Update and then Print. This will bring the completed Condition Report to your screen. Click the Print button that appears at the top of your screen to send to printer. Your Condition Report is now ready to forward to the Client. Redemption and Release To Debtor When you receive authorization from a Client to release the vehicle back to the Debtor, open the case folder and note the Case number. The Case number is listed in the title bar of the Case Folder Window such as “Case – 25”. Click on Tools and Company Forms to select the appropriate release form. Double click on the Release form and the form will be opened in MS Word. Click on the “Get Case” icon in the Word toolbar and enter the case # when prompted. Relevant Case information will automatically be entered into the form. Review the form and make any changes necessary before printing. Click on the “Save Case” icon to save the document in the Document Tab in RepoLion. You should now close the word application. If prompted “Do you wish to save your changes” the answer is NO! Because, changes saved to the original document will permanently change the template. Inactivation of a Case After the vehicle has been transported and all payments have been received, you should inactivate each case. To inactivate a folder, uncheck the Active box on the General Tab and Click Update. This will remove the folder from the Active phone list.